One of the biggest challenges in 360-degree video production is hiding the production footprint. Whether it is a tripod base, a camera operator, or an unsightly shadow, keeping your scene fully immersive requires seamless object removal.
However, you cannot treat a 360-degree equirectangular file like a flat, standard video canvas. Because the image is wrapped into a 2:1 spherical projection, drawing directly on it using standard paint or tracking tools causes severe stretching and tearing at the poles (top and bottom) and edges.
To fix this, we use the LatLongPatcher node in DaVinci Resolve’s Fusion page. This node non-destructively “un-wraps” a specific region of your sphere into a flat, undistorted 2D perspective window, allowing you to perform flawless object removals before injecting the patch back into the 360-degree world.
Phase 1: The Core Extraction Setup
Before removing any objects, you must extract your target area into a flat, workable 2D canvas.
The Node Layout:
| MediaIn1 (Raw Video Source) |
➔ | LatLongPatcher1 (Extract Mode) |
➔ | Your Cleanup Stream (Paint or Clean Plate) |
- Import Media: Bring your original equirectangular footage (MediaIn1) into the Fusion grid.
- Add the Patcher: Press Shift + Spacebar, type
LatLongPatcher, and add the node to your grid. Connect the output of MediaIn1 into it. - Set to Extract: Select the LatLongPatcher node, navigate to the Inspector, and change the Method dropdown menu to Extract.
- Isolate the Object: Use the Pan (left/right) and Tilt (up/down) sliders to rotate the camera view until the object you want to remove (such as the tripod legs) is dead-center in your viewer window.
- Adjust Scale: Tweak the FoV (Field of View) slider to zoom in or out until you have a comfortable 2D workspace with enough surrounding texture around your object.
Phase 2: Choosing Your Object Removal Method
Depending on the complexity of your shot and whether the camera is moving, choose one of the following two professional removal workflows:
Method 1: The Paint Node (Best for Stationary Shots & Organic Textures)
This method is ideal for locked-off tripod shots or environments with organic textures—like grass, asphalt, or gravel—where you can easily clone pixels from a neighboring area.
The Node Layout:
| LatLongPatcher1 (Extracted 2D Window) |
➔ | Paint Node (Pnt) (Clone Tool Fixes) |
➔ | To Injection Stage (Phase 3 Setup) |
- Insert Paint: Add a Paint node directly after your extraction pipeline.
- Select the Clone Tool: Look at the toolbar directly above the viewer window and select the Clone tool icon (represented by a rubber stamp).
- Set Lifetime: In the Inspector, open the Stroke Controls tab. Change the Duration dropdown from Single Frame to All Frames. This ensures your paint stroke stays active across your entire timeline.
- Sample and Clean: Hold down Alt (Windows) or Option (Mac) and click on a clean patch of texture near your target object to sample it. Release the key, and paint directly over the tripod or operator to clone the clean texture over it.
Method 2: Clean Plate & GridWarp (Best for Complex Patterns & Dynamic Camera Movement)
When the background texture is geometric (like floor tiles, brickwork, or hardwood floors) or when the camera is physically moving through space, a simple paint stroke will fail. This method utilizes an external clean plate still image and a GridWarp node to fix complex alignments.
The Node Layout:
| LatLongPatcher1 (Live Video Stream) |
➔ [Background Input] | Merge1 Node (Combines Streams) |
|
MediaIn2 (Clean Still) ➔ LatLongPatcher2 (Same Camera Matrix) ➔ GridWarp Node (Fixes Parallax Drift) |
➔ [Foreground Input] |
The Reality of Parallax: Why We Need Motion Compensation
It is a common misconception that camera mounts stay perfectly static relative to the background. If your camera is moving through an environment—whether it is mounted on a mechanical slider, pushed on a dolly, or rolling on a vehicle—and the object you want to remove is anchored to the environment (or if the camera moves independently of the support base below it), the physical distance between the camera lens and that object changes over time.
As the camera approaches or recedes from the target area, spatial parallax occurs. The perspective lines of the floorboards, tile grouting, or brick patterns stretch, expand, and warp dynamically because the lens’s physical point of view is shifting. If you stamp a flat, static clean plate snapshot over this moving environment, it will look like a floating “sticker” within seconds because the ground underneath is physically changing perspective. To hide this asset cleanly, we must actively warp the texture to match the moving world.
Step 1: Prep and Align the Clean Plate
- Bring in the Still: Import your edited, tripod-free clean plate still image (MediaIn2) into your node graph.
- Match the Viewport: Pipe it into a second LatLongPatcher node (LatLongPatcher2).
- Crucial Alignment: Copy the exact Pan, Tilt, and FoV values from your first patcher and paste them into this second patcher. This ensures both 2D windows match pixel-for-pixel.
Step 2: Correcting Perspective Shift with GridWarp
- Insert Warp & Merge: Add a GridWarp node (GW) directly after your clean plate’s extraction pipeline. Connect its output into the Green Foreground Input of a Merge node (Merge1). Pipe your live video line (LatLongPatcher1) into the Yellow Background Input of that same Merge node.
- Define the Source Mesh: Move your playhead to Frame 0. In the GridWarp Inspector, ensure the mode is set to Source. Sub-divide your grid using the X Grid and Y Grid sliders until you have a flexible mesh covering your clean plate area. Align the grid vertices with prominent lines on the floor (like grout lines or floorboard seams).
- Warp the Destination: Move downstream to a frame where the camera movement has caused your clean plate texture to drift out of alignment with the live video background.
- Correct Perspective Shift: In the Inspector, change the GridWarp mode dropdown from Source to Destination. Gently nudge the individual mesh vertices in your viewer. Warping the destination grid stretches and bends the static clean plate texture, forcing its perspective lines to realign perfectly with the moving background video as the camera’s spatial relationship to the ground changes.
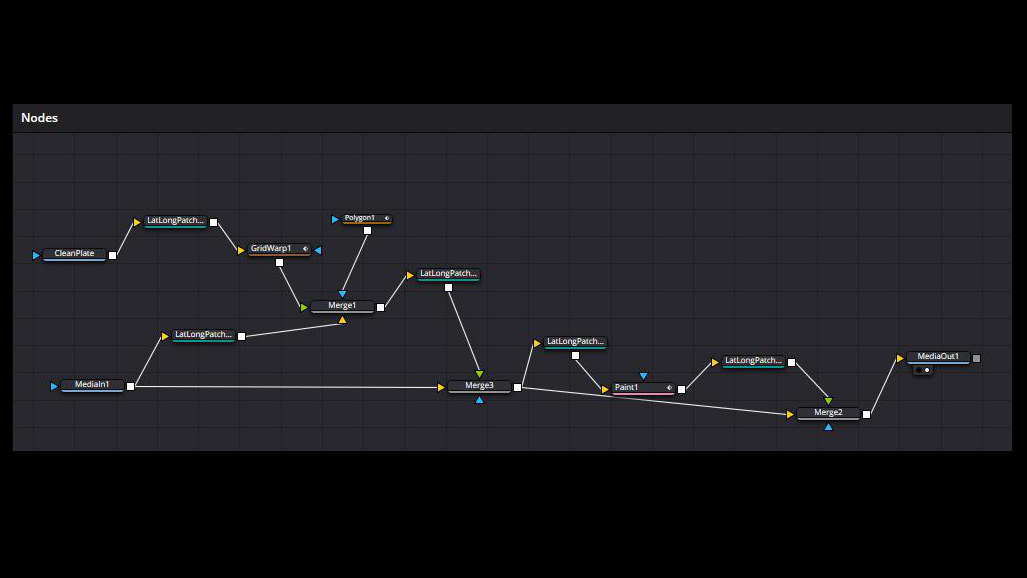
Phase 3: Injecting the Patch Back into the 360 World
Once your object is cleanly painted out or perfectly perspective-warped, you must re-wrap your flat 2D patch back into a proper 2:1 equirectangular sphere.
The Node Layout:
|
Step 1: The Fix Stream Merge1 (Your Object Fix) |
| ▼ |
|
Step 2: The Re-Wrap LatLongPatcher3 (Inject Mode) |
| ▼ (Feeds into Foreground Input) |
|
Step 3: The Target Merge (Merge2) Combines the Inject Patch with the Raw Video Line (MediaIn1) as the Background |
| ▼ |
|
Step 4: Terminal Render Target MediaOut1 Node |
- Add the Injector: Place a final LatLongPatcher node (LatLongPatcher3) at the end of your clean patch stream.
- Set to Inject: In the Inspector, change the Method dropdown to Inject.
- Match the Viewport Matrix: Copy the exact Pan, Tilt, and FoV coordinates used in your initial extraction phase and paste them into this injection node. The node will automatically take your flat 2D fix, distort it spherically, and place it back precisely where it belongs in the 360-degree environment.
- Merge with Original Footage: Add a final Merge node (Merge2). Connect your original, untouched raw video line (MediaIn1) into the Yellow Background Input of the Merge node. Connect the output of your Injection node into the Green Foreground Input.
- Isolate with a Mask: To prevent your patch from accidentally overwriting clean areas outside your fix, attach a Polygon Mask node to the Blue Mask Input of the final Merge node. Draw a tight window around just your object removal area.
Your final output from Merge2 will now display a flawless 360 video with the tripod or target object completely eliminated across the entire timeline, mapped perfectly to the sphere, and ready for your MediaOut1 node.
About the Author:
Daniel John Brown is a VR photographer, videographer, and founder of Meidansha. Based in Japan, he specializes in high-resolution immersive media and technical post-production workflows.
• Business & Portfolio: Connect with my corporate team at Meidansha.To see more on 360 photography and videography please see the category top
360度映像のオブジェクト消去法:DaVinci Resolve FusionでLatLongPatcherを使いこなす
360度動画制作における最大の課題の1つは、撮影時の機材やスタッフの痕跡をいかに隠すかということです。三脚のベース、カメラマンの映り込み、あるいは不自然な影など、完全に没入感のあるシーンを作るには、これらを綺麗に消去(オブジェクトリムーバル)する必要があります。
しかし、360度正距円筒図法(エクイレクタングラー)のファイルを、通常のフラットな動画キャンバスと同じように扱うことはできません。映像が2:1の球状に投影されているため、通常のペイントツールやトラッキングツールを使って直接描き込むと、極部(画面の最上部・最下部)や左右の端で深刻な歪み(引き伸ばしや破れ)が発生してしまいます。
この問題を解決するために、DaVinci ResolveのFusionページに用意されている「LatLongPatcher」ノードを使用します。このノードは、全天球映像の特定の領域を、歪みのないフラットな2Dパースペクティブ(透視投影)ウィンドウへ非破壊で「展開(アンラップ)」してくれます。これにより、2D上で完璧な消去作業を行ってから、再びそのパッチを360度の世界へと戻すことが可能になります。
フェーズ 1:コアとなる展開セットアップ
オブジェクトを消去する前に、まずは対象のエリアをフラットで作業しやすい2Dキャンバスとして抽出する必要があります。
ノードの配置構造:
| MediaIn1 (未加工のビデオソース) |
➔ | LatLongPatcher1 (Extract モード) |
➔ | クリーンアップ処理 (ペイントまたはクリーンプレート) |
- 素材のインポート: 元のエクイレクタングラー映像(MediaIn1)をFusionのグリッド内に読み込みます。
- Patcherノードの追加: Shift + スペースキーを押し、
LatLongPatcherと入力してノードをグリッドに追加します。MediaIn1の出力をこのノードに接続します。 - Extractに設定: LatLongPatcherノードを選択し、インスペクタを開いて「Method」ドロップダウンメニューを「Extract」(抽出)に変更します。
- オブジェクトの分離: 「Pan」(左右)と「Tilt」(上下)のスライダーを動かしてカメラの視野を回転させ、消去したいオブジェクト(三脚の脚など)がビューアウィンドウの真ん中に来るように調整します。
- スケールの調整: 「FoV」(視野角)スライダーを微調整し、オブジェクトの周囲のテクスチャが十分に収まる、作業しやすい適度な広さの2Dワークスペースを作ります。
フェーズ 2:オブジェクト消去手法の選択
カットの複雑さや、カメラが動いているかどうかに応じて、以下の2つのプロフェッショナルな消去ワークフローから最適な方を選択します。
手法 1:ペイントノード(固定ショット&有機的なテクスチャに最適)
この手法は、三脚を完全に固定して撮影したショットや、芝生、アスファルト、砂利などの有機的なテクスチャを持つ環境に最適です。周囲の綺麗なエリアからピクセルを簡単にクローン(複製)して上書きできます。
ノードの配置構造:
| LatLongPatcher1 (抽出された2Dウィンドウ) |
➔ | Paint ノード (Pnt) (クローンツールによる修正) |
➔ | インジェクション工程へ (フェーズ 3 の準備) |
- 有効期間の設定: インスペクタの「Stroke Controls」(ストローク制御)タブを開きます。「Duration」(期間)ドロップダウンを「Single Frame」(1フレーム)から「All Frames」(全フレーム)に変更します。これにより、描いた修正ストロークがタイムライン全体で持続するようになります。
- サンプリングとクリーンアップ: Altキー(Windows)またはOptionキー(Mac)を押しながら、消去したい対象の近くにある綺麗なテクスチャ部分をクリックしてサンプルを採取します。キーを離し、三脚や人の上に直接ブラシで描き込んで、きれいなテクスチャを上書きしていきます。
手法 2:クリーンプレート & GridWarp(複雑な模様 & 動的なカメラワークに最適)
背景のテクスチャが幾何学的(床のタイル、レンガ、フローリングなど)である場合や、カメラが空間内を移動している場合は、単純なペイントによる塗りつぶしは通用しません。この手法では、外部で編集した三脚のない静止画(クリーンプレート)と「GridWarp」ノードを組み合わせ、複雑な位置合わせをクリアします。
ノードの配置構造:
| LatLongPatcher1 (実景映像ストリーム) |
➔ [背景入力] | Merge1 ノード (ストリームの合成) |
|
MediaIn2(クリーン静止画) ➔ LatLongPatcher2 (カメラマトリクスを一致) ➔ GridWarp ノード (視差によるズレの補正) |
➔ [前景入力] |
視差(パララックス)の現実:なぜ動きの補正が必要なのか?
「カメラの台座は背景に対して常に完全に固定されている」というのは、よくある誤解です。カメラが電動スライダー、ドリー、あるいは移動する車両に設置されて空間内を移動しており、かつ消去したいターゲットが地面や壁に固定されている場合(またはカメラが下の支柱ベースとは独立して位置を変える場合)、カメラレンズと消去対象の物理的な距離は時間の経過とともに絶えず変化します。
カメラが対象エリアに接近または後退するにつれて、空間的な「視差(パララックス)」が生じます。レンズの物理的な視点(Point of View)がシフトするため、床板のライン、タイルの目地、レンガの模様といったパース線が、動的に引き伸ばされたり、広がったり、歪んだりします。もし、この動く環境の上にフラットで静止したクリーンプレートをただ重ねただけでは、下の地面のパースが変化していくため、ものの数秒でパッチが浮いた「ステッカー」のように見えてしまいます。この機材跡をきれいに隠し通すには、移動する世界に合わせてテクスチャを能動的に歪ませる(ワープさせる)必要があります。
ステップ 1:クリーンプレートの準備と配置
- 静止画の読み込み: 外部で三脚を消去・加工済みのクリーンプレート静止画(MediaIn2)をノードグラフに読み込みます。
- 画角の完全一致: これを2つ目のLatLongPatcherノード(LatLongPatcher2)に接続します。
- 極めて重要な位置合わせ: 1つ目のPatcher(映像用)の「Pan」「Tilt」「FoV」の数値を完全にコピーし、この2つ目のPatcherにペーストします。これにより、双方の2Dウィンドウがピクセル単位で完全に一致します。
ステップ 2:GridWarpによるパースのズレの補正
- WarpとMergeの挿入: クリーンプレートを展開した直後に「GridWarp」ノード(GW)を追加します。その出力をMergeノード(Merge1)の「緑色の前景入力」に接続します。そして、動く実景映像のライン(LatLongPatcher1)を、同じMerge1の「黄色の背景入力」に接続します。
- ソースメッシュの定義: タイムラインの「フレーム 0」に移動します。GridWarpのインスペクタで、モードが「Source」に設定されていることを確認します。「X Grid」と「Y Grid」のスライダーを使ってグリッドを細かく分割し、クリーンプレートのパッチ範囲をカバーする柔軟なメッシュを作ります。グリッドの頂点を、床の目地やフローリングの継ぎ目など、目立つラインに合わせて配置します。
- デスティネーションのワープ: カメラの移動によって、クリーンプレートのテクスチャが周囲の映像のラインからズレてきてしまっている、少し進んだ先のフレームへ移動します。
- パースシフトの修正: インスペクタで、GridWarpのモードドロップダウンを「Source」から「Destination」(ディスティネーション)に変更します。ビューア上で、メッシュの各頂点をつまんで静かに動かします。目的地(Destination)のグリッドを歪ませることで、静止したクリーンプレートのテクスチャが伸縮・変形し、カメラと地面との位置関係の変化に伴って動く背景映像のパース線へと完璧に再整列させることができます。
フェーズ 3:パッチを360度の世界へインジェクション(戻し)する
オブジェクトがきれいにペイント消去されたか、あるいは完璧にパース補正されてマージされたら、そのフラットな2Dパッチを再び正しい2:1のエクイレクタングラー全天球へと戻す必要があります。
ノードの配置構造:
|
ステップ 1:修正済みのストリーム Merge1(オブジェクト修正箇所) |
| ▼ |
|
ステップ 2:全天球への再カプセル化 LatLongPatcher3(Inject モード) |
| ▼ (前景入力へ接続) |
|
ステップ 3:合成用の最終マージ(Merge2) インジェクションしたパッチと、背景となる元の生の映像ライン(MediaIn1)を合成 |
| ▼ |
|
ステップ 4:最終レンダリング出力 MediaOut1 ノード |
- 戻し用Patcherの追加: クリーンパッチが完成したストリームの最後に、3つ目の「LatLongPatcher」ノード(LatLongPatcher3)を配置します。
- Injectに設定: LatLongPatcher3のインスペクタを開き、「Method」ドロップダウンを「Inject」(注入)に変更します。
- Viewportマトリクスの完全一致: 最初のフェーズ1(抽出時)で使用した「Pan」「Tilt」「FoV」の座標を完全にコピーし、このインジェクションノードにペーストします。これにより、ノードがフラットな2Dパッチを自動的に球状に歪ませ、360度の空間内の本来あるべき正確な位置へと配置してくれます。
- オリジナル映像との合成: 最後の「Merge」ノード(Merge2)を追加します。何も手を加えていない元の生映像ライン(MediaIn1)をMerge2の「黄色の背景入力」に接続します。そして、インジェクションノード(LatLongPatcher3)の出力を「緑色の前景入力」に接続します。
- マスクによる限定化: 修正パッチが、関係のない綺麗な領域まで誤って上書きしてしまわないように、「Polygon」マスクノードを最後のMerge2の「青色のマスク入力」に接続します。そして、オブジェクトを消去したエリアの周囲だけをタイトに囲むマスクを描きます。
以上の工程により、Merge2からの最終出力は、三脚や機材がタイムライン全体にわたって完璧に消去され、全天球に完全にマッピングされた、非の打ち所がない360度動画となります。あとはこれを「MediaOut1」ノードへ送ればレンダリングの準備は完了です。
著者について:
ダニエル・ジョン・ブラウン(Daniel John Brown)は、VRフォトグラファー、ビデオグラファーであり、明段舎株式会社の代表。日本を拠点に、高解像度のイマーシブメディア(没入型メディア)の制作や、高度なポストプロダクションワークフローを専門としている。
• ビジネス&ポートフォリオ: コーポレートチームへのご連絡・ご依頼は Meidansha をご覧ください。360度動画や静止画編集について関心あればこのカテゴリーをご確認ください。