日本語が後に続きます
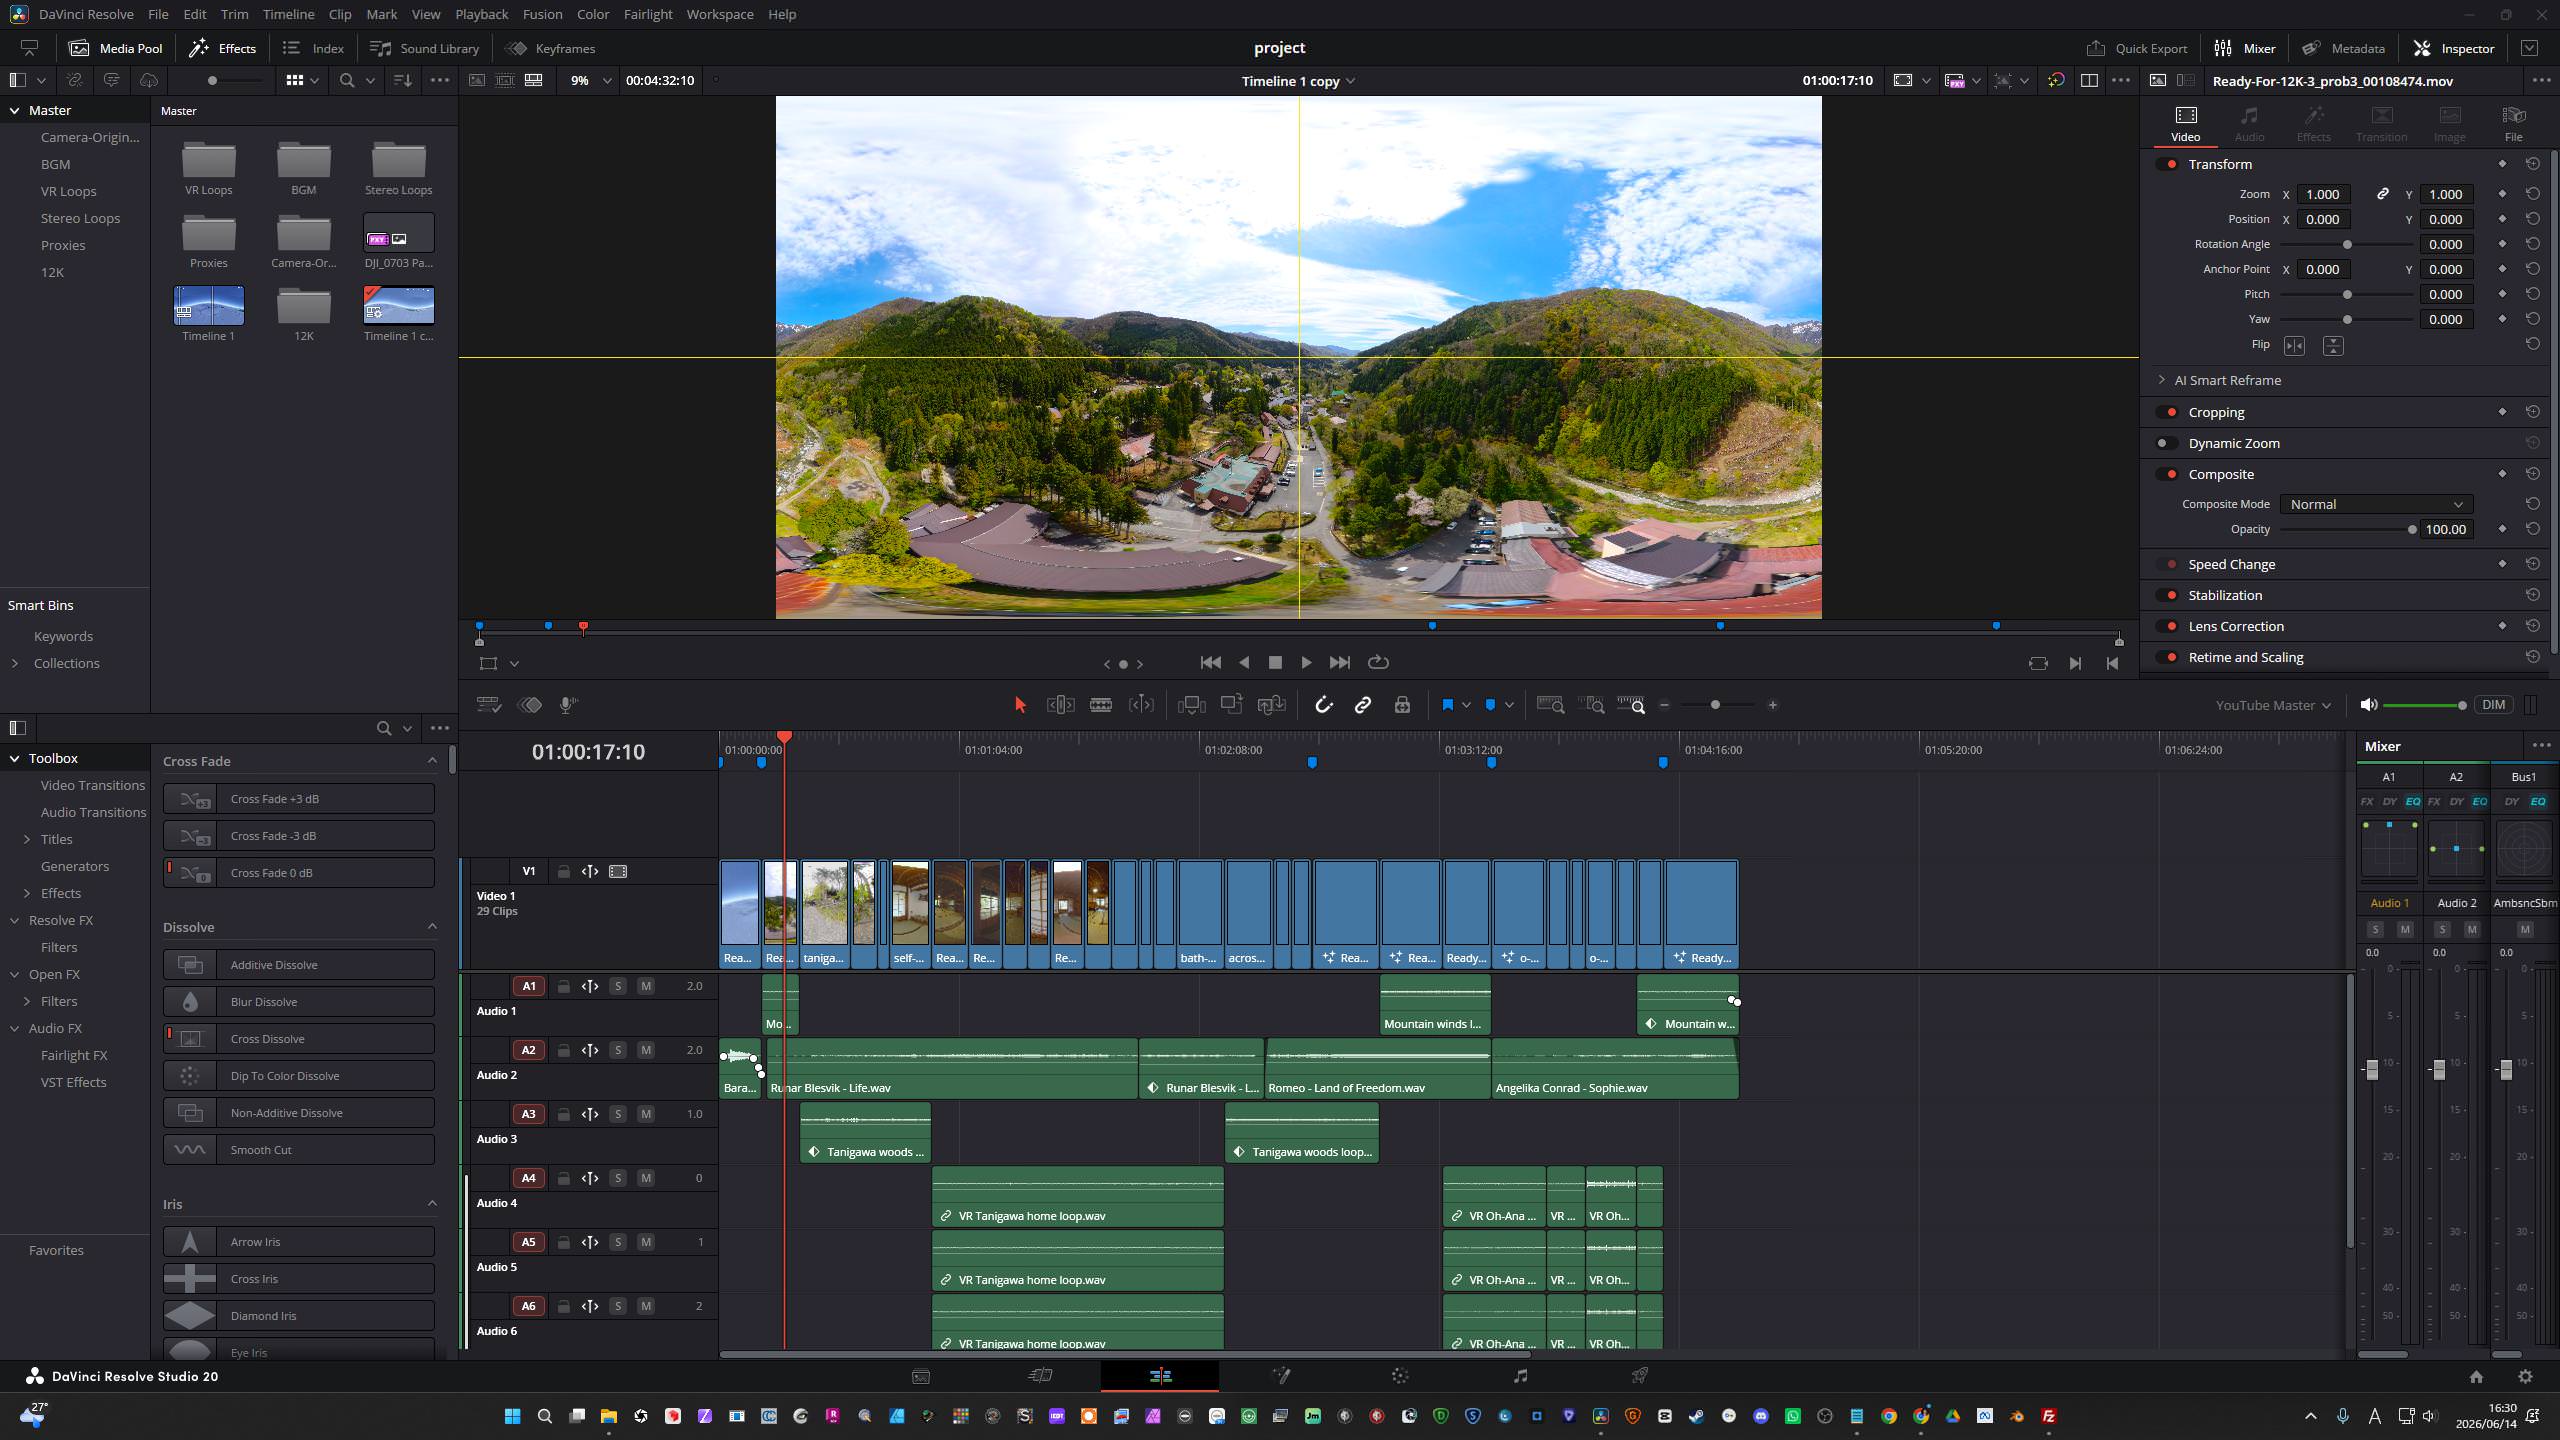
This is a how-to article for 8K VR Proxy workflow in Davinici Resolve Studio 20. Editing high-bitrate, stitched 8K equirectangular files is notoriously brutal on computer hardware. Even on high-end Windows workstations, scrubbing natively through raw 8K 360-degree footage can easily turn your timeline into a choppy slideshow.
To maintain a smooth creative flow, a proxy workflow is a necessity. However, if you try to use DaVinci Resolve Studio’s built-in “Generate Proxy Media” tool or the standalone Blackmagic Proxy Generator, you will hit a frustrating bottleneck: they force a standard 16:9 aspect ratio (like 1920×1080), squashing your perfect 2:1 spherical footage and breaking your stitching preview. Furthermore, batch-relinking these standard proxies fails completely with this format.
To solve this, we must use a manual transcoding workflow that bypasses the automated proxy generator entirely, keeping your 2:1 aspect ratio intact and restoring silky-smooth playback. Here is the exact step-by-step blueprint.
Phase 1: Review & Preparation (Insta360 Studio)
The sole objective of this phase is to trim your raw data and prep it into a clean, “flat” master file. Do not waste time attempting to set a Point of Interest (POI) or altering your angles here; Insta360 Studio completely ignores timeline orientation and framing adjustments when exporting a clip as a true 360 video.
1. Technical Setup
- Lens Guard: In the Right Sidebar, click the Media Tab (first icon). Scroll down to Accessories and manually select Standard or Premium depending on your physical setup. Do not leave this on “Auto.”
- Stitching: In the same Media Tab, scroll to Stitching Settings and select Optical Flow Stitching for the cleanest seams.
- Stabilization: Leave this on its default FlowState Stabilization setting.
2. The Timeline Cut
- Trimming: Because we aren’t adjusting angles, your only task on the timeline is trimming. Move the playhead on the Bottom Timeline and use the Yellow Brackets to isolate and mark the exact section of the clip you want to export.
3. High-Fidelity Export Settings
Click the Yellow Export Icon (Bottom Right) and apply these settings to ensure your master file remains uncompressed and grade-ready:
- Export Type: 360 Video
- Resolution: 7680 x 3840 (8K)
- Codec: ProRes 422 HQ
- Image Processing: Uncheck both Color Plus and Remove Grain.
- Keep it Flat: Do not add any sharpening and do not attempt any color grading inside Insta360 Studio. Keep the footage completely clean for the edit suite.
Phase 2: The Windows-Optimized Proxy Workflow
Now for the workaround. Because Resolve’s standard proxy tools ruin the 2:1 aspect ratio, we will use the Media Management tool to transcode custom, lightweight 2:1 proxies that Windows can handle natively.
1. Transcode to MP4 (The Custom Method)
Open DaVinci Resolve Studio and navigate to the Media Page (the first icon at the bottom).
- Select Your Footage: Highlight your newly exported 8K ProRes clips in the Media Pool.
- Open Media Management: Go to the top menu and select File > Media Management… then click on the Transcode tab at the top of the pop-up window.
-
Configure the Custom 2:1 Settings: Set the parameters precisely to avoid the squash bug:
• Select: “All media” or “Selected timeline clips.”
• Format: MP4
• Video Codec: H.265
• Resolution: Select Custom and manually enter 1920 x 960 (for ultra-light 2K proxies) or 3840 x 1920 (for 4K proxies). - Execute Transcode: Click Browse, select a dedicated Proxy folder on your fast external SSD, and click Start. Windows handles these custom H.265 MP4s seamlessly.
2. Linking the Manual Proxies (Overcoming the Extension Deficit)
Because you didn’t use Resolve’s standard “Generate Proxy” button, the automatic linker will often fail when you right-click the camera original and attempt a standard folder link. This happens because your master files are .mov (ProRes) and your proxies are .mp4 (H.265).
To pair them properly without crashing your workflow, you have two options:
- The Single File Method: If you only have a few clips, highlight your original 8K master clips in the Media Pool, right-click, and select Relink Proxy Media. Select the target file individually one by one.
- The Batch Workaround (Loose File Match): If you are linking dozens of files, you need to use an advanced reconform search that tells DaVinci to find matching names while ignoring the file extension. Import your newly transcoded proxies into a separate bin. Select your main timeline, right-click and choose Timelines > Reconform from Bins. Under the match criteria, ensure File Name is checked and set it specifically to Loose file name match. Point it at your proxy bin, and Resolve will instantly jump the gap between the
.movand.mp4containers.
Once linked, a small “pxy” icon will appear on your clips, confirming your aspect ratio is now a perfect, unsquashed 2:1 sphere.
Mastering the Timeline Setup & Final Export
When you are finished cutting your edit with proxies and are ready to color grade, match your master workflow, and export, you must configure your timeline correctly to ensure the final 8K delivery actually renders out without issues.
1. Match Timeline to HQ Master Resolution
Before hitting render, you must change your timeline settings to match the exact resolution of your high-quality master clips.
- Right-click your active timeline in the Media Pool and select Timelines > Timeline Settings.
- Uncheck “Use Project Settings.”
- Set the resolution to your target master size: 7680 x 3840.
2. Eliminate Black Bars & Check Project Settings
Working with a true 2:1 equirectangular sphere means any structural mismatch will introduce accidental letterboxing or pillarboxing.
- The Visual Check: Scan your timeline viewer to ensure there are no unintended black bars on the top, bottom, or sides of your image.
- Image Scaling: In your master Project Settings, verify that your output scaling and aspect format match your target resolution perfectly. If your media aspect ratios are mismatching, ensure your input scaling is set to fill the frame cleanly without destroying the 360 geometry.
3. Critical Render Deliver Page Check
When you move over to the Deliver page to export your master file, there are two distinct settings you must check to ensure you don’t accidentally bake your low-resolution proxies into your final film:
- Go to the top menu: Playback > Proxy Handling and ensure it is set to Prefer Originals or Disable Proxies. Verify the change by looking for the small “HQ” badge replacing the “pxy” badge on your timeline clips.
- On the Deliver page sidebar, expand the Advanced Settings drop-down under the Video Export tab. Ensure that “Use proxy media” is unchecked. If left checked, Resolve will export your final master using the 2K transcoded files instead of your 8K ProRes masters.
Why This Fixes “Jerky Playback”
By using the Media Management tool instead of standard proxy generation, you optimize your system on three fronts:
- The Container: Forcing an MP4 wrapper ensures smooth, native OS playback on Windows.
- The Resolution: Dropping the resolution to 1920×960 asks your GPU to process a mere 1/16th of the data compared to the native 8K master.
- Fusion Efficiency: Because the core video stream is now light, your system has massive overhead remaining to compute complex nodes, effects, and VR tracking—meaning your Fusion edits will be a lot smoother throughout the entire post-production pipeline.
About the Author:
Daniel John Brown is a VR photographer, videographer, and founder of Meidansha. Based in Japan, he specializes in high-resolution immersive media and technical post-production workflows.
• Business & Portfolio: Connect with my corporate team at Meidansha.To see more on 360 photography and videography please see the category top
8K360度動画:DaVinci Resolve Studio 20でのプロキシー・ワークフロー
高ビットレートでスティッチされた8Kのエクイレクタングラー(正距円筒図法)ファイルを編集するのは、PCハードウェアにとって非常に過酷な作業です。ハイスペックなWindowsワークステーションであっても、撮影したままの生の8K 360度映像をそのままスクラブしようとすると、タイムラインがカクつき、スライドショーのようになってしまいます。
快適にクリエイティブな編集作業を進めるためには、プロキシワークフローが不可欠です。しかし、DaVinci Resolve Studioの内蔵「プロキシメディアの生成」ツールや、単体のBlackmagic Proxy Generatorを使おうとすると、不満の残る大きな壁にぶつかることになります。これらのツールは強制的に標準の16:9アスペクト比(1920×1080など)でプロキシを生成するため、せっかくの2:1の全天球映像が左右に潰れてしまい、スティッチのプレビューが崩れてしまうのです。 さらに、このフォーマットでは、生成された標準プロキシの一括再リンク(リリンク)も完全に失敗してしまいます。
この問題を解決するには、自動のプロキシジェネレーターを完全にバイパスし、2:1のアスペクト比を維持したままスムーズな再生を実現する「手動トランスコード・ワークフロー」を使用する必要があります。その具体的なステップを以下に解説します。
フェーズ 1:確認とエクスポート準備(Insta360 Studio)
このフェーズの唯一の目的は、未加工のデータをトリミングし、クリーンで「フラット」なマスターファイルに仕上げることです。Insta360 Studioでは、クリップを真の360度動画としてエクスポートする場合、タイムライン上の方向(オリエンテーション)や画角(POI)の設定は完全に無視されます。 そのため、ここでアングル調整などに時間を費やす必要はありません。
1. テクニカルセットアップ
- レンズガード: 右サイドバーの「メディア」タブ(最初のアイコン)をクリックします。「アクセサリー」までスクロールし、実際の撮影環境に合わせて「標準」または「プレミアム」を手動で選択します。絶対に「自動」のままにしないでください。
- スティッチング: 同じ「メディア」タブ内で「スティッチング設定」までスクロールし、継ぎ目が最も自然になる「オプティカルフロースティッチ(Optical Flow Stitching)」を選択します。
- 手ブレ補正: デフォルトの「FlowState手ブレ補正」のままにしておきます。
2. タイムラインのカット(トリミング)
- トリミング: アングルの調整は行わないため、タイムライン上での作業はトリミングのみとなります。下のタイムラインで再生ヘッドを動かし、黄色のブラケット(角括弧)を使って、エクスポートしたいクリップの範囲を指定します。
3. 高画質エクスポート設定
右下の黄色の「エクスポート」アイコンをクリックし、マスターファイルの画質を落とさずに編集へ回せるよう、以下の設定を適用します。
- エクスポートタイプ: 360度動画
- 解像度: 7680 x 3840 (8K)
- コーデック: ProRes 422 HQ
- 画像処理: Color Plusとノイズ除去の両方のチェックを外します。
- フラットな状態を維持: Insta360 Studio内ではシャープネスを追加せず、カラーグレーディングも行わないでください。編集ソフト側で本格的な作業ができるよう、映像は完全にクリーンな状態で出力します。
フェーズ 2:Windowsに最適化したプロキシワークフロー
ここからが回避策の本番です。Resolveの標準プロキシツールでは2:1のアスペクト比が崩れてしまうため、代わりに「メディア管理」ツールを使い、Windowsがネイティブで快適に処理できる軽量なカスタム2:1プロキシをトランスコードします。
1. MP4へのトランスコード(カスタム方法)
DaVinci Resolve Studioを開き、画面最下部にある「メディア」ページ(一番左のアイコン)に移動します。
- 素材の選択: メディアプール内で、先ほどエクスポートした8K ProResクリップを選択(ハイライト)します。
- メディア管理を開く: 上部メニューから「ファイル」>「メディア管理…」を選択し、表示されたウィンドウの上部にある「トランスコード」タブをクリックします。
- カスタム2:1設定の構成: 画面が潰れるバグを回避するため、以下のパラメータを正確に設定します。
• 選択: 「すべてのメディア」または「選択したタイムラインのクリップ」
• フォーマット: MP4
• ビデオコーデック: H.265
• 解像度: 「カスタム」を選択し、手動で「1920 x 960」(超軽量な2Kプロキシの場合)または「3840 x 1920」(4Kプロキシの場合)を入力します。 - トランスコードの実行: 「ブラウズ」をクリックし、高速な外付けSSD内に作成したプロキシ専用フォルダを指定して、「開始」をクリックします。WindowsはこれらのカスタムH.265 MP4ファイルをネイティブでスムーズに処理できます。
2. 手動プロキシのリンク(拡張子の違いを克服する)
Resolveの自動「プロキシ生成」ボタンを使用しなかったため、元のカメラ素材を右クリックして通常のフォルダリンクを試みても、自動リンカーが失敗することがよくあります。これは、マスターファイルが.mov(ProRes)であるのに対し、プロキシファイルが.mp4(H.265)と、拡張子が異なっていることが原因です。
ワークフローを停滞させずにこれらを正しくペアリングするには、2つの方法があります。
- 個別ファイル個別リンク法: クリップ数が少ない場合は、メディアプール内の元の8Kマスタークリップを選択し、右クリックして「プロキシメディアを再リンク」を選択します。対象のプロキシファイルを1つずつ手動で指定してリンクしていきます。
- バッチ処理での回避策(緩やかなファイル名一致): 大量のファイルをリンクする必要がある場合は、拡張子を無視して一致するファイル名を探すようDaVinciに指示する、高度な「再コンフォーム」機能を使用します。まず、新しくトランスコードしたプロキシを別のビン(フォルダ)にインポートします。次に、メインのタイムラインを右クリックし、「タイムライン」>「ビンから再コンフォーム」を選択します。一致条件の項目で「ファイル名」にチェックを入れ、設定を「緩やかなファイル名一致(Loose file name match)」にします。ターゲットとしてプロキシの入ったビンを指定すると、Resolveは
.movと.mp4のコンテナの違いを瞬時に飛び越え、すべてのファイルを一括でリンクしてくれます。
正しくリンクされると、クリップに小さな「pxy」アイコンが表示され、アスペクト比が潰れていない、完璧な2:1の全天球映像になっていることが確認できます。
タイムライン設定と最終エクスポートの極意
プロキシを使ったカット編集が終わり、カラーグレーディングやマスターワークフローへの移行、および最終エクスポートの準備が整ったら、8Kの最終出力がトラブルなくレンダリングされるよう、タイムラインを正しく設定する必要があります。
1. タイムラインを高画質マスターの解像度に合わせる
レンダリングを開始する前に、タイムラインの設定を高画質のマスタークリップと全く同じ解像度に変更する必要があります。
- メディアプール内のアクティブなタイムラインを右クリックし、「タイムライン」>「タイムライン設定」を選択します。
- 「プロジェクト設定を使用」のチェックを外します。
- 解像度をターゲットであるマスターサイズ:7680 x 3840に設定します。
2. 黒帯の排除とプロジェクト設定の確認
真の2:1エクイレクタングラー映像を扱う際、設定に少しでも不一致があると、意図しないレターボックス(上下の黒帯)やピラーボックス(左右の黒帯)が発生してしまいます。
- 目視での確認: タイムラインビューアを細かくチェックし、映像の上下左右に意図しない黒帯が入っていないか確認します。
- 画像のスケーリング: マスターの「プロジェクト設定」を開き、出力スケーリングとアスペクト比のフォーマットが、ターゲットの解像度と完全に一致しているか確認します。もし素材のアスペクト比にズレがある場合は、360度のジオメトリ(球体の形状)を崩さないように注意しながら、フレームが綺麗に埋まるよう入力スケーリングを設定してください。
3. レンダリング時のデリバーページでの重要な確認項目
マスターファイルをエクスポートするために「デリバー」ページに移動した際、低解像度のプロキシメディアが最終映像に誤って焼き付けられてしまうのを防ぐため、2つの設定を必ず確認してください。
- 上部メニューの「再生」>「プロキシの処理」に移動し、「オリジナルを優先」または「プロキシを無効化」に設定されていることを確認します。タイムライン上のクリップの「pxy」バッジが、高画質を示す「HQ」バッジに切り替わっていることで確認できます。
- デリバーページのサイドバーにある「ビデオ」エクスポートタブを開き、「詳細設定」ドロップダウンを展開します。「プロキシメディアを使用」のチェックが外れていることを必ず確認してください。 ここにチェックが入ったままだと、Resolveは8K ProResマスターではなく、トランスコードした2Kのプロキシファイルを使って最終出力をレンダリングしてしまいます。
なぜこの方法で「再生のカクつき」が直るのか?
標準のプロキシ生成ではなく、「メディア管理」ツールを使用することで、システムへの負荷を3つの側面から最適化できます。
- コンテナの最適化: MP4ラッパーを強制することで、Windows環境においてOSネイティブでのスムーズな再生が可能になります。
- 解像度の削減: 解像度を1920×960に落とすことで、GPUが処理すべきデータ量はネイティブの8Kマスターと比較してわずか16分の1になります。
- Fusionの効率化: コアとなるビデオストリームが非常に軽量になるため、PCシステム側には複雑なノードやエフェクト、VRトラッキングの計算を行うための莫大な余力が残ります。結果として、ポストプロダクションの全工程を通してFusionでの編集作業が格段にスムーズになります。
著者について:
ダニエル・ジョン・ブラウン(Daniel John Brown)は、VRフォトグラファー、ビデオグラファーであり、名電社(Meidansha)の代表。日本を拠点に、高解像度のイマーシブメディア(没入型メディア)の制作や、高度なポストプロダクションワークフローを専門としている。
• ビジネス&ポートフォリオ: コーポレートチームへのご連絡・ご依頼は Meidansha をご覧ください。360度動画や静止画編集について関心あればこのカテゴリーをご確認ください。