Ambisonics Monitoring and Spatial Routing in Davinci Resolve Studio 21
Step-by-Step Guide: Ambisonics Monitoring & Spatial Routing in DaVinci Resolve Studio 21
To successfully manage Ambisonics first-order (1st order, 4-channel) project while monitoring ambisonics safely in standard stereo on a Windows machine, you need a precise routing matrix inside DaVinci Resolve Studio 21.
Because Windows sound drivers and standard headphones cannot decode raw 4-channel spatial fields natively, we will set up Bus 1 as your master 4-channel Ambisonic deliverable, and Bus 2 as a dedicated stereo downmix/monitoring line equipped with an Ambisonic-to-Stereo decoder plugin.
Here is the comprehensive, step-by-step setup guide from timeline creation to final export.
Step 1: Timeline Creation & Ambisonics Audio Configuration
Before dropping any files onto your timeline, the master sequence must be explicitly configured to accept multi-channel spatial data.
- Open DaVinci Resolve Studio 21 and go to the Project Settings (the gear icon in the bottom-right corner).
- Under Fairlight, ensure your Timeline Audio Spatial Audio Format is supported (leave on default or off, as we will define the bus properties manually). Click Save.
- Go to the Edit Page. In your Media Pool, right-click and select Timelines > Create New Timeline…
- In the dialog box, uncheck “Use Project Settings” and click on the Audio tab.
- Change the Main Track Type dropdown from Stereo to Adaptive 4.
Why Adaptive 4? Ambisonics 1st order requires exactly 4 discrete audio channels wrapped together into a single track mapping (W, X, Y, Z). An Adaptive 4 track layout allows Resolve to process these 4 channels bound together cleanly without splitting them into separate mono strips.
- Click Create.
Step 2: Setting Clip Attributes for Ambisonics Assets
If your raw 360 audio file or spatial microphone WAV files are imported, Resolve might misinterpret them as 4 separate mono tracks or a standard quadraphonic layout. You must force the clip properties to recognize the Ambisonic architecture.
- In the Media Pool, right-click on your raw spatial audio clip and select Clip Attributes…
- Navigate to the Audio tab inside the Clip Attributes window.
- Change the Format dropdown from Mono or Stereo to Ambisonic Regular (or Adaptive 4 depending on your exact spatial mic file type; Ambisonic Regular automatically flags the metadata for standard W, X, Y, Z FuMa or AmbiX layout).
- Ensure the track allocation matches Tracks: 1 and channel assignments map linearly (Channel 1 to Embedded Ch 1, Channel 2 to Embedded Ch 2, etc.). Click OK.
- Drag this clip onto your new timeline. It will populate into your Adaptive 4 track (labeled A1).
Because you want to combine both the 360 soundscape and your background stereo elements for YouTube, we will use YouTube’s official hybrid delivery standard: First-Order Ambisonics with Head-Locked Stereo (a 6-channel payload). Channels 1–4 are explicitly reserved for your moving spatial field (W, X, Y, Z), and Channels 5 and 6 carry your flat, head-locked Left and Right stereo music.
Step 3: Setting Up Bus Formats & Assignments for Ambisonics
1. Configure the Bus Formats
Go to Fairlight > Bus Format. Keep your exact layout names, but adjust the structural channel width dropdowns to match this layout:
| Bus | Bus Name | Format (Dropdown Menu) | Purpose |
|---|---|---|---|
| B1 | AmbisonicsSubmix | Adaptive 4 | Pristine, un-decoded pass-through for just your spatial mic tracks. |
| B2 | StereoMonitor | Stereo | Your Main Mixing Line & 3DVista Master. Everything flattens cleanly here. |
| B3 | YouTubeMaster | Adaptive 6 | Your Final YouTube Master. (4 Channels Ambisonic + 2 Channels Stereo). |
| B4 | AmbisonicsMonitor | Adaptive 4 | Dedicated Plugin Slot. Holds dearVR (AmbiX to Binaural). |
2. The Exact Bus Assignment Matrix for Ambisonics
Go to Fairlight > Bus Assignment. We will map your 7 individual tracks and link your sub-mixes using clear logic gates.
A. The Stereo Elements (Tracks 1, 2, 3 – Music & Stereo Loops)
Route them to B2 and B3 only:
- Tracks 1, 2, 3 -> Bus 2 (StereoMonitor)
- Tracks 1, 2, 3 -> Bus 3 (YouTubeMaster)
- Crucial Setting for Bus 3: Because YouTubeMaster is an Adaptive 6 bus, look at the channel mapping/output settings for Tracks 1, 2, and 3 going to Bus 3. Ensure they are explicitly routed to target Channels 5 and 6. This perfectly separates your background music into the designated “head-locked stereo” channels for YouTube!
B. The Spatial Elements (Linked Tracks 4–7)
Route your linked spatial environment microphone tracks to B1, B2, and B4:
- Linked Tracks -> Bus 1 (AmbisonicsSubmix)
- Linked Tracks -> Bus 2 (StereoMonitor) (Fairlight automatically flattens it flat to standard stereo here alongside your music!)
- Linked Tracks -> Bus 4 (AmbisonicsMonitor)
C. Injecting the Sub-Buses (Bus-to-Bus Routing)
Look at the bottom left of the matrix grid under the Buses category:
- Bus 1 -> Bus 3 (YouTubeMaster): Ensure Bus 1 maps directly to Channels 1, 2, 3, and 4 of Bus 3. This puts your clean 360 audio exactly where it belongs.
- Bus 4 -> Bus 2 (StereoMonitor): Pipes the 3D binaural decoded headphone mix from the plugin right to your master monitoring line.
3. Visual Routing & Signal Flow
This layout visualizes how the different formats travel through your sub-mixes to populate the hybrid 6-channel final render block:
| Source Audio Streams | Primary Sub-Buses (Processing) | Final Target Destinations |
|---|---|---|
| Stereo Tracks 1-3 (Background Music / Sound Effects) |
Bypasses Spatial sub-mixes completely to avoid processing interference |
➔ Bus 3: YouTubeMaster ➔ Bus 2: StereoMonitor |
| Spatial Tracks 4-7 (Linked 4-channel microphone arrays) |
➔ Bus 1: AmbisonicsSubmix ➔ Bus 4: AmbisonicsMonitor |
➔ Bus 3: YouTubeMaster ➔ Bus 2: StereoMonitor |
Step 4: Set Your Plugin & Control Room Monitoring for Ambisonics in Stereo
Phase 1: Downloading & Installing the Software
Because the native Sennheiser website newsletter reCAPTCHA is famously buggy, you must download the unified installer package from the preserved community links (like the verified Reddit resource threads here: https://mautic.sennheiser.com/r/0dcede9a491c36d51ca7200e0. Just a warning: This is the whole DearVR Suite and the download is over 3 GB).
- Download the Package: Locate and download the offline installer folder containing
dearVR AMBI MICRO v1.10.0and thedearVR Spatial Connectsuite. You do not need the other apps to monitor your ambisonics. - Run the Installer: Open the
.exefile on your Windows machine. - Select Formats: When prompted, ensure VST3 is explicitly checked. This is the format DaVinci Resolve Studio 21 requires to read multi-channel audio tracks properly.
- Choose Components: Ensure you check the boxes for:
dearVR AMBI MICRO VST3dearVR Spatial Connect (Main App)dearVR Spatial Connect Adapter
- Restart Your PC: Once installation finishes, restart Windows to cleanly initialize the new audio drivers and network ports.
Phase 2: Configuring the Windows & VR Connection Loop
To get head-tracking working without a final 360° video, we use Dear Reality’s built-in virtual studio environment to host the tracking data loop.
- Initialize Link: Plug your Meta Quest into your PC via your Link Cable. Put the headset on, enable Quest Link, and ensure you can see your virtual Windows desktop screen inside the headset.
- Launch the Main App: On your Windows desktop, open the standalone application named dearVR Spatial Connect.
- Configure a Virtual Room:
- Click on the Settings gear icon inside the app.
- Go to the BACKGROUND dropdown menu. Since you don’t have a 360° video yet, select a virtual layout like Multichannel Studio, Cinema, or *Main Space Grid*.
- Set the Data Ports:
- In the same settings panel, turn the DEARVR HEADTRACKING toggle switch to ON.
- Locate the VST OSC PORT OUT box and type in the standard tracking port:
7001.
- Launch & Link the Adapter:
- Go to your Windows desktop taskbar (bottom right corner), click the
^arrow to show hidden icons, and look for the Spatial Connect Adapter tray icon. - Right-click the icon and select Settings.
- Change the Protocol dropdown menu to **Spatial Connect**.
- Set the Head Rotation Port to match exactly:
7001. - Click Apply.
- The status logo on the adapter window will instantly flip to Connected.
- Go to your Windows desktop taskbar (bottom right corner), click the
Phase 3: Routing the Audio Buses in DaVinci Resolve
Now we must build a clean, bulletproof routing path inside the Fairlight page that isolates your raw spatial audio mathematics from your standard headphone outputs.
- Open the Project: Launch DaVinci Resolve Studio 21 and head straight to the Fairlight Page.
- Configure Studio Preferences:
- Go to DaVinci Resolve > Preferences > System > Video and Audio I/O.
- Set your main Audio Output Device to Headphones (Oculus Virtual Audio Device) or Oculus Link Audio.
- Set the Monitor Speaker Configuration format to Stereo (2.0), ensuring Channel 1 maps to Left and Channel 2 maps to Right. Click Save.
- Create the Bus Layout: Open the Fairlight top menu bar, select Bus Format, and build four dedicated paths:
- Bus 1 (AmbisonicsSubmix): Set Format to Adaptive 4. (This is your master spatial mixing engine).
- Bus 2 (3DVistaDownmix): Set Format to Stereo. (For flat 2D web-tours, if needed later).
- Bus 3 (YouTubeExport): Set Format to Adaptive 6. (This is your final 6-channel render bus).
- Bus 4 (AmbisonicsMonitor): Set Format to Stereo. (This sends the final 3D audio to your headset).
- Map the Bus Connections: Go to Fairlight > Bus Assignment and establish these exact, clean link nodes:
- Route your Spatial Audio Timeline Tracks directly into Bus 1.
- Route Bus 1 out into Bus 4 (to send the raw sphere to the monitoring decoder).
- Route Bus 1 out into Bus 3 (to feed the spatial data to your YouTube exporter).
Phase 4: Setting Up the Plugins to Monitor the Sound
With the routing built and the data ports wide open, we load the plugins and decode the math into a real-time, head-tracked 3D headphone mix.
- Load the Monitoring Decoder:
- Go to your Fairlight mixer panel and look at the vertical strip for Bus 4 (AmbisonicsMonitor).
- Click the
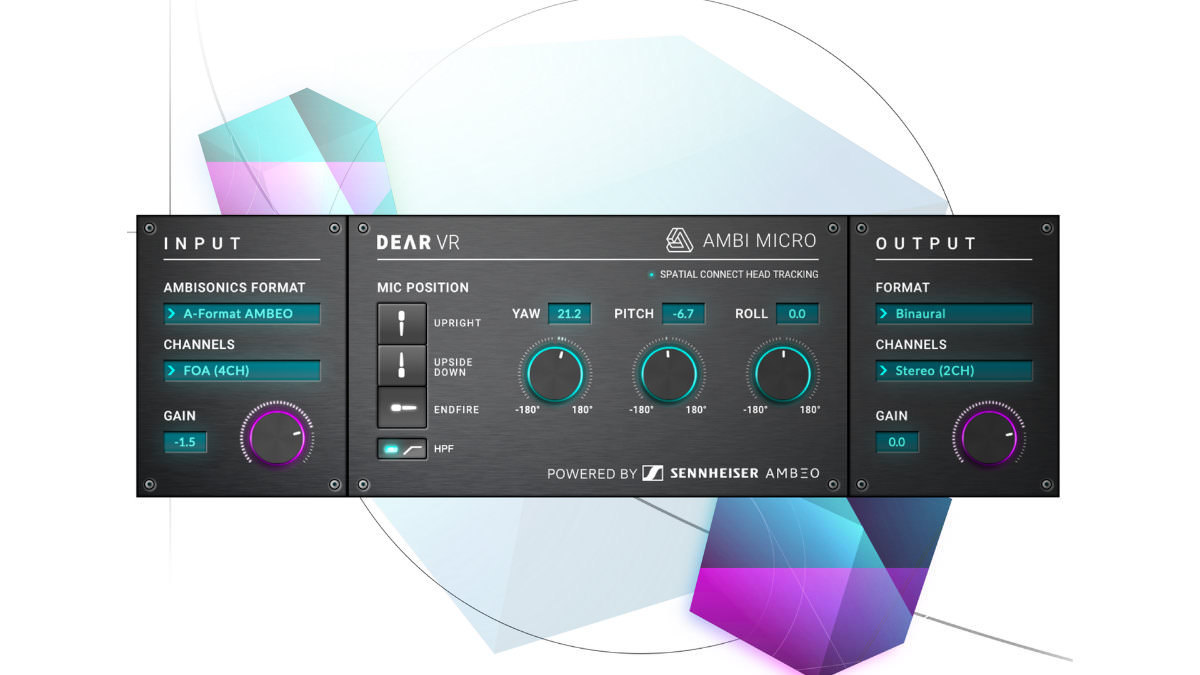
+icon in its Effects slot and insert dearVR AMBI MICRO v1.10.0.
- Configure the Plugin Math: Open the plugin window and set the parameters:
- INPUT FORMAT: Set to AmbiX (this decodes the 4-channel W, X, Y, Z spatial data pipeline correctly).
- OUTPUT FORMAT: Set to Binaural (Headphones).
- Verify the Tracking Light: Look at the tracking connection indicator inside the plugin interface. Because the background adapter app is actively feeding data from your Quest, the light will instantly turn a solid GREEN.
- Perform the Physical Check: Put your Meta Quest headset on and hit the spacebar to play your audio timeline. Physically turn your head 90 degrees to the left. The audio landscape will instantly anchor itself to the virtual room, forcing sounds that were directly in front of you to hit your right ear dynamically.
- How to Mix and Adjust Content:
- Go to the vertical mixer strip for Bus 1 (AmbisonicsSubmix) and drop an identical instance of dearVR AMBI MICRO v1.10.0 into its effects rack.
- Look at your video timeline viewer. If a sound source is visually located 45 degrees to your right, open your Bus 1 plugin and use your mouse to twist the Yaw knob until the internal sound visualizer ball matches the 45-degree angle.
- Because your Bus 4 pipeline is successfully decoding head-movements via your Quest, you can turn your head freely and hear your adjustments lock perfectly into 3D space with absolute technical precision before you ever click export.
Step 5: Exporting Your Separate Deliverables
When you enter the Deliver Page, your bus configuration keeps your two outputs perfectly partitioned:
Exporting for 3DVista (The Balanced Flat Master)
- In the Render Settings Audio tab, set Output Track 1 to Bus 2 (StereoMonitor).
- Set Channels to 2.
- Result: Your background music and your naturally flattened 360 environment are combined into a clean, flat Left/Right web-friendly stereo mix.
Exporting for YouTube VR (The Professional 6-Channel Hybrid)
- Change Output Track 1 to Bus 3 (YouTubeMaster).
- Set Channels to 6.
- Result: A pristine 6-channel master file. Channels 1–4 contain your raw, un-compromised 1st order Ambisonic spatial environment, completely untouched by the monitoring plugin. Channels 5–6 carry your clean stereo background music.
- Run this file through your FFmpeg tool and check both boxes (“Spherical” and “Spatial Audio”) inside the Metadata Injector app. YouTube will process it flawlessly!
About the Author:
Daniel John Brown is a VR photographer, videographer, and founder of Meidansha. Based in Japan, he specializes in high-resolution immersive media and technical post-production workflows.
- Business & Portfolio: Connect with my corporate team at Meidansha.
To see more on 360 photography and videography please see the category top
DaVinci Resolve Studio 21 で構築するアンビソニックス監視ワークフロー
フィーチャー画像はゼンハイザー提供
標準のWindowsマシンにおいて、第1次アンビソニックス(1st order、4チャンネル)プロジェクトを安全にヘッドフォンでステレオ監視(モニタリング)しながら、完璧に編集・ミキシングするには、DaVinci Resolve Studio 21内部で厳密なオーディルートをマッピングする必要があります。
Windowsの標準ドライバーやヘッドフォンは、4チャンネルの空間音響をそのままデコードして再生することができません。そのため、「Bus 1」をデコードを通さない最終出力用の4チャンネルマスターとして設定し、「Bus 2」にデコーダープラグインを適用して、リアルタイムでバイノーラル変換(ステレオダウンミックス)されるモニタリング専用バスとして構築します。
以下に、タイムライン作成から書き出しまでの完全な設定ガイドを解説します。
ステップ 1:タイムラインの作成とオーディオ初期設定
タイムラインに素材をドロップする前に、まずは空間音響データを受け入れられるようにマスターシーケンスを設定する必要があります。
- DaVinci Resolve Studio 21を起動し、画面右下のプロジェクト設定(ギアのマーク)を開きます。
- Fairlightタブに移動し、タイムラインオーディオの空間オーディオフォーマット項目を確認します(バスの属性は後で手動で割り当てるため、デフォルトまたはオフのままで問題ありません)。「保存」をクリックします。
- エディットページに移動し、メディアプール内で右クリックして タイムライン > 新規タイムラインを作成… を選択します。
- 設定ダイアログで「プロジェクト設定を使用」のチェックを外し、オーディオタブをクリックします。
- メインのトラックタイプのドロップダウンメニューを「ステレオ」から**「Adaptive 4」**(固定4チャンネル)に変更します。
なぜAdaptive 4なのか? 第1次アンビソニックスは、4つの独立したオーディオチャンネル(W, X, Y, Z)が1つの束にまとめられたトラック構造を必要とします。「Adaptive 4」というトラック構造を選択することで、Resolveは4つのチャンネルを別々のモノラルへ分解することなく、1つのトラックとして一括で制御・処理できるようになります。
- 「作成」をクリックします。
ステップ 2:空間音響ファイルのクリップ属性(Clip Attributes)調整
撮影・録音された生の360度オーディオファイルや空間マイクのWAVファイルを読み込んだ際、Resolveがそれらを単なる「4つの別々のモノラルトラック」や「クアドラフォニック(4点サラウンド)」として誤認識してしまうことがあります。アンビソニックスの構造を認識させるために、以下の属性変更を行います。
- メディアプール内で、読み込んだ生の空間音響クリップを右クリックし、クリップ属性… を選択します。
- ウィンドウ上部のオーディオタブをクリックします。
- フォーマットのドロップダウンを「モノラル」や「ステレオ」から、「Ambisonic Regular」(またはマイクの仕様に合わせてAdaptive 4)に変更します(Ambisonic Regularに設定することで、標準的な W, X, Y, Z の FuMa または AmbiX 配列メタデータとしてフラグが立ちます)。
- トラック割り当てが Tracks: 1 であり、各チャンネルがリニアに対応していること(チャンネル1が埋め込みCh 1に、チャンネル2がCh 2に…)を確認し、「OK」をクリックします。
- このクリップを新しく作成したタイムラインの「Adaptive 4」トラック(A1)にドラッグ&ドロップします。
今回の最終目的は、360度の空間音響とステレオのBGM(音楽)を合成し、YouTube推奨のハイブリッド配信規格である「第1次アンビソニックス + ヘッドロックステレオ(合計6チャンネル構成)」を出力することです。 1〜4チャンネルを移動する空間音響(W, X, Y, Z)に使用し、5・6チャンネルを頭の動きに追従しない固定ステレオ音楽(Left & Right)に使用します。
ステップ 3:バスフォーマット(Bus Format)とアサイン設定
1. バスフォーマットの設定
Fairlight > バスフォーマット を開き、以下のように用途に合わせたチャンネル幅で4つのバスを構築します。
| バス | バス名 | フォーマット (選択メニュー) | 目的 |
|---|---|---|---|
| B1 | AmbisonicsSubmix | Adaptive 4 | 空間マイク専用。デコードを一切加えない未加工の空間音響ストリーム。 |
| B2 | StereoMonitor | Stereo | メインミキシングライン&3DVista用マスター。すべての音がステレオに統合されます。 |
| B3 | YouTubeMaster | Adaptive 6 | YouTube配信用最終マスター(4ch空間音響 + 2ch固定ステレオ)。 |
| B4 | AmbisonicsMonitor | Adaptive 4 | デコーダープラグインを適用する専用バス(AmbiX to バイノーラル)。 |
2. バスアサイン(Bus Assignment)の設計
Fairlight > バスアサイン を開き、各タイムライントラックと作成したサブバス間の接続を行います。
A. ステレオ要素(トラック 1, 2, 3 – 音楽や効果音)
B2とB3のみに出力します。
- トラック 1, 2, 3 -> Bus 2 (StereoMonitor)
- トラック 1, 2, 3 -> Bus 3 (YouTubeMaster)
- Bus 3へのアサインにおける極めて重要な設定: YouTubeMaster(Bus 3)はAdaptive 6バスです。トラック1, 2, 3の出力先マッピングを開き、必ず 「チャンネル 5 と 6」 へと割り当てを誘導してください。これにより、BGMが空間音響用チャンネルを邪魔することなく、YouTube推奨の「ヘッドロックステレオ」用の領域へと正確に送られます。
B. 空間音響要素(リンクされたトラック 4〜7)
空間マイクの全天球音源トラックをB1、B2、B4に出力します。
- 空間音響トラック -> Bus 1 (AmbisonicsSubmix)
- 空間音響トラック -> Bus 2 (StereoMonitor) (音楽とミックスされ、ここで通常の2chステレオへと自然にフラット化されます)
- 空間音響トラック -> Bus 4 (AmbisonicsMonitor)
C. バス同士の接続(Bus-to-Bus Routing)
アサインマトリクス画面の左下(Busesエリア)で、以下を接続します。
- Bus 1 -> Bus 3 (YouTubeMaster): Bus 1の4チャンネル出力を、**Bus 3の1〜4チャンネル**へ直接マップします。これにより、空間音響が指定の先頭4チャンネルに収まります。
- Bus 4 -> Bus 2 (StereoMonitor): 後述のプラグインによってバイノーラル変換された3D音響を、直接モニター用ステレオマスターへと送り込みます。
3. シグナルフローとルーティング構造
以下のマトリックスは、各チャンネル配列がどのようにファイナライズ用の6チャンネルコンテナに整理されていくかを示しています。
| 入力トラックの分類 | 適用されるサブバス(中間処理) | 最終レンダリングへの統合形態 |
|---|---|---|
| ステレオ要素(Ch 1-3) (空間表現を含まないBGM・固定効果音) |
空間用ノード(B1, B4)を通さず、音質の劣化や不要な位相干渉を完全に防御 |
➔ Bus 3: YouTubeMaster ➔ Bus 2: StereoMonitor |
| アンビソニックス要素(Ch 4-7) (空間マイクから集音された4次元音場) |
➔ Bus 1: AmbisonicsSubmix ➔ Bus 4: AmbisonicsMonitor |
➔ Bus 3: YouTubeMaster ➔ Bus 2: StereoMonitor |
ステップ 4:デコーダープラグインの適用とVRヘッドセット連携
フェーズ 1:ソフトウェアパッケージのインストール
ゼンハイザー公式の再設定ダウンロードフォームはブラウザの仕様によりエラーが出やすいため、コミュニティ等で安定して配布されているパッケージ(Reddit上の保存リソース等: `https://mautic.sennheiser.com/r/0dcede9a491c36d51ca7200e0` )から統合インストーラーを取得します。(※DearVR Suite全体のダウンロード容量は約3GB強になります)
- オフラインインストーラーをダウンロードし、フォルダ内にある
dearVR AMBI MICRO v1.10.0およびdearVR Spatial Connectを用意します。 - PC上で
.exeインストーラーを起動します。 - VST3 フォーマットに必ずチェックを入れてください(DaVinci Resolve Studio 21 がマルチチャンネルエフェクトとしてロードするために必須となります)。
- 構成要素から以下を選択し、インストールを実行します。
dearVR AMBI MICRO VST3dearVR Spatial Connect (Main App)dearVR Spatial Connect Adapter
- インストール完了後、オーディオドライバと通信ポートをアクティベートするため、必ず一度 Windows を再起動してください。
フェーズ 2:Quest 3 への接続とヘッドトラッキング環境の構築
本番の360度動画素材を流す前に、ヘッドトラッキングデータをResolve側にリアルタイムに伝えるポートを開放します。
- Oculus Linkケーブルを使用して Meta Quest をPCに接続します。ヘッドセットを装着し、Quest Linkを有効にして、PCの仮想デスクトップ画面がVR空間内に映し出されていることを確認します。
- Windowsデスクトップ側で、単体アプリケーションの dearVR Spatial Connect を起動します。
- アプリ内のギアマーク(設定)をクリックし、BACKGROUND の項目から、任意の仮想スタジオレイアウト(*Multichannel Studio*、*Cinema*、またはグリッド空間)を選択します。
- 設定画面内の **DEARVR HEADTRACKING** トグルスイッチを **ON** にします。
- VST OSC PORT OUT の入力値が標準の **
7001** になっていることを確認します。 - Windowsタスクバー右下のインジケーター(システムトレイ)から、**Spatial Connect Adapter** のアイコンを右クリックして「Settings」を開きます。
- Protocolを **Spatial Connect** に、Head Rotation Port を一致する **
7001** に設定し、「Apply」をクリックします(ステータスが「Connected」になれば通信成功です)。
フェーズ 3:Fairlightでのシステムオーディオルーティング
DaVinci Resolve Studio 21 内部の音をQuest 3(VRヘッドセット)へ送る経路を作ります。
- DaVinci Resolve Studio 21 を起動し、Fairlightページを開きます。
- 上部メニューの DaVinci Resolve > 環境設定 > システム > ビデオ&オーディオ I/O を選択します。
- 出力デバイスを Headphones (Oculus Virtual Audio Device) または Oculus Link Audio に切り替えます。
- モニタースピーカーの構成を「ステレオ(2.0)」にし、1チャンネルがLeft、2チャンネルがRightに対応していることを確認して保存します。
- 上部メニューの **Fairlight > バスフォーマット** を開き、先述の表の通り4つのバス(B1: Adaptive 4、B2: Stereo、B3: Adaptive 6、B4: Stereo)を設定します。
- **Fairlight > バスアサイン** を開き、トラックおよびバスの相関を正しく接続します。
フェーズ 4:デコーダープラグインの適用と音響のリアルタイム調整
- Fairlightのミキサー画面で、Bus 4 (AmbisonicsMonitor) の「エフェクト」スロットをクリックし、dearVR AMBI MICRO v1.10.0 を挿入します。
- プラグインのコントロール画面を開き、以下のパラメータを適用します。
- INPUT FORMAT: AmbiX (4チャンネルの W, X, Y, Z データを正しく読み込む配列形式)
- OUTPUT FORMAT: Binaural (Headphones) (ステレオヘッドフォン用立体デコード)
- 接続ランプ(Tracking)が常時「グリーン(緑)」に点灯していることを確認します。これで、Quest 3のセンサーから送られてくる首の動き情報がプラグインと同期されました。
- トラッキングのテスト: ヘッドセットを装着し、タイムラインを再生します。首を左に90度回したとき、正面に定位していた音が右耳側に自然に移動して固定されているかを確認します。
- 空間ポジショニング(ミキシング)のやり方:
- **Bus 1 (AmbisonicsSubmix)** のエフェクトスロットにも全く同じ
dearVR AMBI MICRO v1.10.0を適用します。 - タイムライン映像の中で、45度右側に位置する音源がある場合、Bus 1上のプラグインを開いて **Yaw(左右方向)** ノブを操作し、表示されるボールの位置を45度に合わせます。
- 本物のVR空間で頭を回した際の音響特性をその場で確認しながら、マスターデータの空間定位を思いのままに調整することができます。
- **Bus 1 (AmbisonicsSubmix)** のエフェクトスロットにも全く同じ
ステップ 5:書き出し設定(デリバーページでの仕分け)
設定したバスルーティングは、書き出し(デリバー)段階において用途に合わせて自動的に書き出しファイルを切り分ける役目を果たします。
3DVista用(フラットな汎用ステレオ音源の書き出し)
- デリバーページのオーディオ設定タブで、書き出しトラック 1 を Bus 2 (StereoMonitor) に指定します。
- チャンネル数を 2 に設定します。
- 結果: BGMと、360度空間音響が2チャンネルに統合された綺麗な「通常のフラットステレオ音声」が書き出され、web用3DVistaで安定して動作します。
YouTube VR用(空間音響 + ステレオBGMの6chハイブリッド音源)
- 書き出しトラック 1 を Bus 3 (YouTubeMaster) に指定します。
- チャンネル数を 6 に設定します。
- 結果: 完璧に隔離された6チャンネルのデータが出力されます(1〜4chはデコード処理の影響を一切受けていないピュアな空間データ、5〜6chはフラットなBGMステレオデータ)。
- このファイルを、事前に確認したFFmpegコマンドを通し、最後にYouTubeのSpatial Media Metadata Injectorアプリで「Spherical」および「Spatial Audio」の両方にチェックを入れて保存してアップロードすれば、YouTube側で空間音響が完全処理されます!
著者について:
ダニエル・ジョン・ブラウン(Daniel John Brown)は、VRフォトグラファー、ビデオグラファーであり、明段舎株式会社の代表。日本を拠点に、高解像度のイマーシブメディア(没入型メディア)の制作や、高度なポストプロダクションワークフローを専門としている。
- ビジネス&ポートフォリオ: コーポレートチームへのご連絡・ご依頼は Meidansha をご覧ください。
360度動画や静止画編集について関心あればこのカテゴリーをご確認ください。